Showing posts with label fighter stick. Show all posts

Wednesday, June 22, 2011

Solder-less Happ Button Mod for Mad Catz SE Fight Stick

I actually performed this mod about a year ago on my own stick, but never published the pictures or process until now because I didn't think anyone would be interested. However, I've noticed a few threads on the Shoryuken forums with individuals asking for "clickier" alternatives to the sensitive-yet-mushy Sanwa and Seimitsu buttons that are currently preferred by most players, and Happ's products fill that niche quite nicely.

Before I dive in with the mod itself, I'm going to take a few moments to talk about differences between Japanese- and American-style arcade buttons and why someone might prefer one over the other. I'll try to be as objective as possible. If you already know or don't care, feel free to skip straight to the tutorial and pics.

Background

American-style buttons--specifically those from arcade part manufacturers Happ and IL--use a plunger positioned atop a Cherry microswitch, which produces a tangible and audible click when depressed. Japanese-style buttons, on the other hand, use a silent, low-resistance switch that provides little-to-no feedback as to when a button press is registered to the system. This is not to say that Japanese-style buttons are not sensitive, as they are actually significantly more sensitive than the Happ designs, there is simply no indication from the button itself as to when it will register.

Overall, Happ buttons seem to be popular with individuals who also like clicky, mechanical keyboards (like the venerable IBM Model M keyboard, which I use at home), as well as folks who grew up with the American arcade scene (i.e., "old farts," as the kids like to call us).

With that out of the way, lets get started. Some people have laughed at this mod for being "ghetto," but I'll take that over those tacky, overwrought custom sticks so many people seem to favor.

Anyway, as it says in the title, this is a solder-less mod, but you'll still need some additional items (Note: this is a button-only mod; putting a Happ stick into an SE is a much bigger undertaking and I don't recommend attempting it unless you are an experienced modder)

What You'll Need

1. Phillips-head screwdriver. To remove the screws from the bottom of the case.

2. Buttons. I recommend the Happ Competition pushbuttons, which have a low travel distance and convex shape, similar to Japanese-style buttons, but with that same satisfying click as the Happ Classics.

3. .187 quick-disconnects. These connect the stick's board to your buttons. The Japanese-style buttons use .110 quick-disconnects, which are too small for your mighty Happ buttons.

4. Wire. Somewhere around 14 to 16 gauge is good, even a little thicker or thinner should be fine, though you'll want to make sure your quick-releases can grab them properly.

5. Cardboard box. This will be used to make a spacer to provide room for your long-ass American buttons, which run deeper than their Japanese counterparts (/innuendo).

6. Glue. For the aforementioned spacer, which needs to be 2 layers deep. Pretty much any glue should be fine, but you want it to be pretty strong and thick. I used wood glue.

7. Optional. You can use special solderless connectors--like these--to join your wires to the stock wires, but I'll show you a little trick later on that works just fine without any connectors.

Step 1: Remove the bottom plate from the stick

Pretty self-explanatory. Just unscrew the 6 screws (2 in the middle and 1 under each of the 4 rubber feet).

Step 2: Trace the outline of the bottom plate onto your cardboard, twice
Depending on the size of your cardboard, you may have to break down your box. While you're at it, go ahead and draw a second square inside of each, about 1" smaller in each direction.

Step 3: Cut your cardboard

Cut along the lines you just drew such that you have 2x 1" frames of cardboard.

Step 4: Glue the frames together to make your spacer
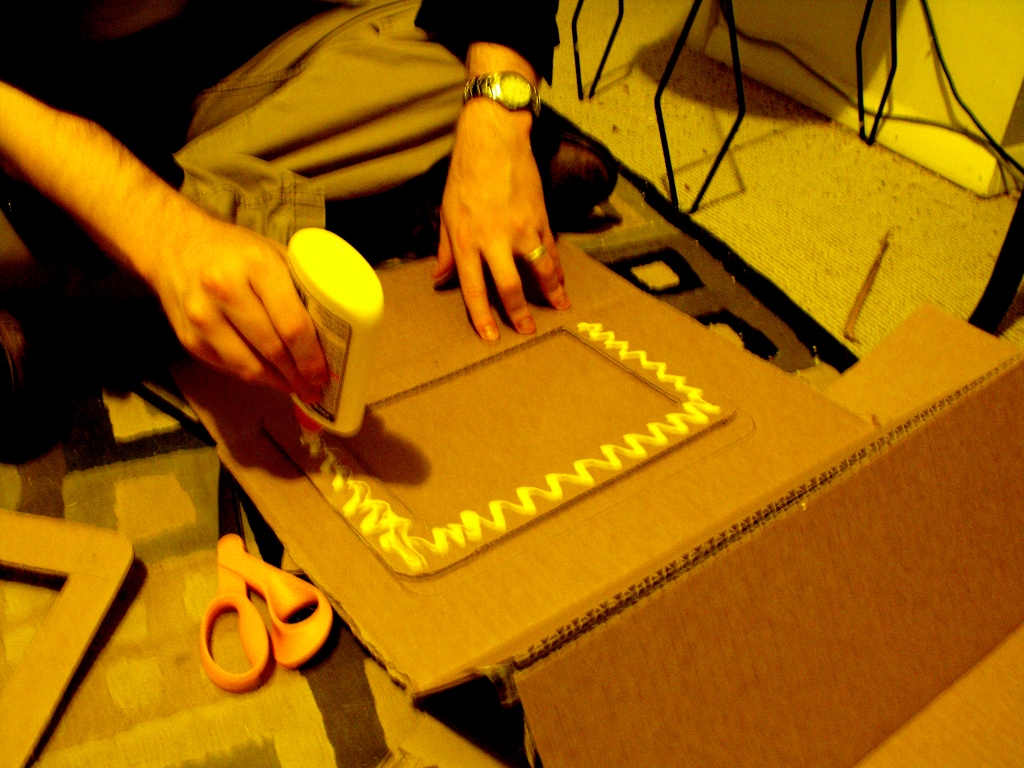
Put your 2 frames together and glue them. This is your spacer, which provides the necessary clearance for your buttons.

For the next couple of steps, which cover removing the old buttons and putting the new ones in, I recommend replacing 1 button at a time so you don't get the wires mixed up. They're color-coded, but if you lose track of which wires go with which button, you'll have to do a bunch of trial-and-error testing at the end to get everything sorted out. Anyway...

Step 5: Pop out your stock buttons

They have a little clippy thing that holds them in:
If you press it in with a screwdriver or whatever, you should be able to pop them out without much trouble. Make sure you disconnect the wires from the bottoms first.

Step 6: Connect your new wires to the old button connectors

You can use the aforementioned optional solderless splicers or you can do what I did: strip the end of your new wire, pull back the rubber sleeve thing from the old .110 quick-disconnects, wrap your bare wire around the old quick-disconnects
and then slide the rubber sleeve over the whole thing. The connection will be fine and the sleeve will hold everything in place nice and tight. :D
Step 7: Add your new buttons

Not much to this step. Just stick 'em in there, screw on the included nut until it's tight and then clip in the included Cherry microswitch. It's a tight squeeze in the tiny SE case, so you'll want to take that into consideration. Take a look at my finished layout:
Step 8: Connect your buttons and test it out

Crimp your .187 quick-disconnects to stripped ends of your new wires and then connect them to your new Happ buttons. One wire connects to the bent post on the side of the microswitch and one connects to the nearest post on the bottom, as shown in the previous pic. Important: if the quick-disconnect on the side touches the bottom plate of your stick, it will ground itself and cause a button press to register (this is bad). To prevent it, you can tape/glue a piece of paper or plastic (I used one of those anti-static bags that an old computer motherboard was shipped in) to the inside of the plate, just to be extra-cautious.
At this point, you should be ready to test your buttons out. Make sure the wires are all connected to the correct button (i.e., the buttons execute the correct actions in-game). If any of them act like they're always pressed until you actually press the button (i.e., its response is backwards), then you've attached the wire to the wrong post.

Step 9: Replace the bottom plate

Once you're sure everything works properly, just cram your wires into place and screw the bottom back on. With the spacer, the screws should be just long enough to catch if you press firmly on the bottom plate. However, they probably won't be able to hold the rubber feet in place securely and you'll probably lose them (though I imagine most of you are like me and have long since lost those rubber feet anyway).

Here's what it looks like from the side. Yes, the cardboard is visible (though not particularly noticeable), and yes, people will probably make fun of you for it.
If you have any questions about the process, hit me up in the comments.

UPDATE: Reader sfkingalpha had the clever idea of covering the cardboard edge with duct tape, which greatly improves the appearance compared with nekkid cardboard:
"Aside from aesthetics, I think this also helps with air tightness and cardboard deterioration!"
Looks great, sfkingalpha!

He was also able to keep his rubber feet by getting longer screws, specifically 3/4 SS panheads.

Here's his finished product:

Friday, June 5, 2009

Conclusions and Helpful Links

Continued from Installing the Hardware

That's pretty much it. Just plug it up and give it a shot. If you find that any of your buttons are acting funny, e.g. nothing happens when you press the button until you let go, try swapping the locations of the wires around on the button (i.e., move the wire from the bent post to one of the straight ones and vice versa).

Once again, here's what the final product looks like:


I've presented my own experience here, but there are tons of others' experiences elsewhere online. The Shoryuken.com forums have some really great info on pad hacking and DIY stick-making. You can also find some great things at the arcadecontrols.com forums (HarumaN is an expert and sells pre-hacked pads at reasonable prices) and xbox-scene.com forums (RDC has some great, thorough information about pad hacking, along with some good tutorials on how to salvage pads after a screw-up).

Gamingnow.net sells damn-near anything a stick-builder could want, all at very reasonable prices.

MAMErs can purchase I-PAC interfaces from Ultimarc. Another option that seems to be preferred on the Shoryuken forums is the Cthulhu board, which can be purchased at gamingnow.net.

UPDATE: even better than the Cthulhu is Toodles' new Chimp board, which provides PC/PS3 support and is designed to accept a hacked 360 common ground pad to provide 360 support with automatic switching among protocols. Plus, it's cheaper than bare Cthulhus used to be! You can get it and other stick materials at Lizard Lick.

UPDATE 3/25/11: Even better than the Chimp board, now you can get the Akishop PS360 triple-mod board, which is a no-solder board that supports PS3, Xbox 360 and PC all at once. It costs slightly more (~$45), but it completely removes padhacking from the equation for the first time ever. This and other arcade stick parts intended for fighting game enthusiasts are available at focusattack.com.

If you want to build a standard, semi-low-profile stick similar to what you would buy in a store, I recommend checking out some of the articles on slagcoin.com. The site has TONS of great information about all aspects of stick-making, and their button layout section is unparalleled.

You can learn more about sticks--including the differences between various brands--here. The section about restrictor plates should be considered required reading for any aspiring stick-jockey.

Page 1: Building an Arcade-style Fight Stick
Page 2: Assembling Your Box
Page 3: Pad Hacking
Page 4: Installing the Hardware
Page 5: Conclusions and Helpful Links

Installing the Hardware

Continued from Pad Hacking

After the Hell that is pad hacking, this part is a breeze and is pretty straigtforward. You just put the buttons into the holes you cut in your panel, then screw down the plastic nut to hold them in place. At this point, I wouldn't bother screwing them down too hard because you might need to rearrange/rotate them later.

Next, attach your microswitches to the buttons. This picture shows a standard cherry microswitch that came with my arcade buttons.

When you go to attach the wires from your hacked pad to your microswitches, the best method is to use .187 sized quick releases (or .110 for japanese-style buttons) rather than soldering the wires directly to the posts, which will make repairing/replacing buttons much easier in the future.

For the joystick, you'll need to drill mounting holes around your large-diameter joystick hole. The Happ stick I chose is a top-mounted stick, but I wanted a smooth surface (i.e., no visible screw/bolt heads) so I countersank the holes a bit and then covered the bolts with wood glue and wood putty before staining/sanding.

This is a pretty permanent solution for better or for worse (no way to reposition the mounting bolts), but I intend to continue using Happ sticks in the future, so it shouldn't be too much of a problem.

After the glue and putty dried, I did a light sanding and proceeded to stain the top and sides.

Once that's all set, you can attach your joystick base by threading the mounting bolts through the appropriate mounting holes and then screwing the nuts onto the bolts. Once you have the base of the joystick bolted into place, follow the instructions that came with your joystick for dropping the stalk into place. The instructions for my Happ were not very clear, so I'll explain my process: first, put the plastic ring--textured side-up--on the stalk, followed by the plastic spacer, then push the stalk through the base until it pokes out the other side next to the microswitches. Next, take the actuator (that funky square piece) and PRESS IT DOWN until you can snap the little clip into place to hold it (the fact that it can be pressed down was not mentioned in my instructions and I erroneously thought the spacer was missized).

After that, you just need to attach your pad to the microswitches via the quick releases. The ground attaches to the side post and the signal attaches to one of the two straight posts on the bottom (one side registers when the button is pressed, the other registers until the button is pressed).


Here is how my first attempt ended up (not so hot):


And here's my second attempt (a little better):

At this point, I added a few extra touches, including hinges for the top to maintain easy access to the wiring and some cabinet handles on the back which also double as cable wraps:


Also, as you may have noticed in some of the previous pics, I attached some staples from a staple gun to the bottom of the box interior. I then used cable ties to stabilize the pads against the staples and keep them from flopping around whenever I move the box.


Page 1: Building an Arcade-style Fight Stick
Page 2: Assembling Your Box
Page 3: Pad Hacking
Page 4: Installing the Hardware
Page 5: Conclusions and Helpful Links

Pad Hacking

Continued from Assembling Your Box

If you're not going to use the pad hack method and will instead use an I-PAC or similar control chip, you can skip this part, obviously. For this stage of the construction, I recommend you have an exacto knife, some thinnish wire (~22 AWG; I actually used an IDE hard drive ribbon), a soldering kit (soldering iron and lots of solder, helping hands with a magnifier, a good lamp) and a hot glue gun.

First off, you'll need to remove the outer shell of your controller, usually using a small phillips-head screwdriver.

Once you're down to the bare PCB (printed circuit board), you'll see that all of the button contacts are covered in this weird black coating that solder won't stick to, so we gotta scrape that shit off to get to the sweet, sweet copper underneath it (you'll want to scrape off more than is shown in this picture; it's just an example).

I've heard of people using a dremel with a wire brush attachment to do this, but that sounds like a bad idea to me so I stuck with using an exacto with a square-ish blade (lay it almost flat against the board so you shave off the black stuff instead of scratching it off with the point/edge).

However you decide to do it, just make sure you don't damage the copper underneath because that's what we want to solder to.

Once you get a pair of wires soldered to their corresponding pads, I recommend you plug your controller into your PC/console and bridge the wires (i.e., touch the bare ends together to make a circuit) to verify that the correct button registers. If not, you'll have to figure out what went wrong and redo it. If everything works properly, take out your hot glue gun and encase the whole area in glue to make things sturdier and take the stress off of your solder joints.

Here's a picture of my first attempt, after everything was soldered and glued. I used some cable ties (slightly off-frame up above the pad) to clean up the horrible mess of mess of wires I made:

This is my second attempt, which used IDE ribbon instead of thicker wires. Looks much neater, eh?

After that's all finished, I recommend you attach the wires to a terminal strip or something similar so that you may more easily attach/remove buttons or--god forbid--another pad.

Here are some things regarding pad hacking that were not clearly stated in other sources I read online:
I used the official XBox 360 wired pad from Microsoft (unfortunately, the wireless pads are a total hassle and sometimes break inexplicably during the construction process). Unlike the Mad Catz 360 pad, the official pad does not seem to have a "common ground," which makes things a little harder. The pads with a common ground are set up such that the signal pad of each button can be grounded against the ground pad of almost ANY other button on the PCB. This makes for less soldering and fewer wires to connect to your buttons. In the case of the official pad, you'll need to solder wires to both pads of each button. The silver lining is that you don't need to muck around with any "solder plan" or daisychain any grounds.

So-called "trigger hacking" a.k.a. "set[ting] trigger to neutral" is a pain in the ass, serves no purpose that I can see and has the potential to cause serious problems. It involves desoldering the trigger potentiometers and removing the whole trigger mechanism, then soldering a 10k ohm resister to the leads to make the controller think it's always completely extended. Some people make it sound like this is necessary to even use the triggers, so I did it to my pads and ever since then my button readouts have been very strange (hitting a button doesn't map it to, say, joy1 button 1, but rather to joy1 button 1 joy3 button 1; that is, it thinks the controller is actually 2 controllers at once...). Instead of opening this can of worms, it appears that you could just leave the trigger mechanism and potentiometer intact, hot glue everything in place in the open position (to make sure nothing gets wonky while you're playing) and then solder to the points just like you would with a hacked trigger. Sounds much easier to me. The other option is just to ignore the triggers entirely and deal with the slight hassle of remapping the trigger-assigned button(s) every time you plug the stick into a 360.

Finally, it's easier to make these connections IMO if you place a small drop of solder on the copper pads and then attach the wire to that instead of trying to do it all at once, juggling solder, the PCB and the wire. If you should happen to mess something up, don't freak out; you can follow the lead from wherever you screwed up to the little dot (called a "via") where the lead pokes through to the backside of the PCB. Just scratch away some of the green coating there and you should be able to solder to it (RDC of the xbox-scene forums has a great tutorial for this process).

Page 1: Building an Arcade-style Fight Stick
Page 2: Assembling Your Box
Page 3: Pad Hacking
Page 4: Installing the Hardware
Page 5: Conclusions and Helpful Links

Assembling Your Box

Continued from Building an Arcade-style Fight Stick

As I said, I won't cover much here, but I will go over some of the tools I used in my construction. A router and table saw will make the job much easier, but you can get by with just a drill, some specialized bits and a circular saw.

For the button holes, I used a 1 1/8" spade bit, purchased at the local hardware store for about $5. You can either lay your button layout sheet directly on the wood and drill through it, or you can just mark the centerpoints and save the layout for later use. The only things to remember with using the spade bit are to make sure you go in straight and be patient to avoid it getting bogged down or stuck.

For the joystick hole, I used a 2 1/4" hole saw attachment. Again, take your time lest you end up with a costly waste of wood due to a misplaced hole.

I recommend attaching your pieces using pegs made of dowel rod and wood glue, since that will be much sturdier (and nicer looking) than just a bunch of nails. If you're a master carpenter, go ahead and do a dovetail joint or anything else that will improve the strength of the box, since you'll be beating the hell out of it on a regular basis.

Page 1: Building an Arcade-style Fight Stick
Page 2: Assembling Your Box
Page 3: Pad Hacking
Page 4: Installing the Hardware
Page 5: Conclusions and Helpful Links

Building an Arcade-style Fight Stick

In anticipation of Capcom's release of Street Fighter 4 on the PC, I decided to build a 2-player arcade console, similar to those available from X-Arcade. There are many options and choices to be made in such a project, as well as dozens of pitfalls, so I thought I'd share my experience to help inform anyone else who wants to give it a shot.

Step 1: Defining Your Goals

This is a pretty intense project, so you'll want to have a good plan from the outset. It can be costly to change your mind halfway through, so make sure you've decided as much as you can before you even get started. Some things you have to decide:

A. Which platform(s) do you want your stick to be compatible with?

Are you strictly a PC/MAME gamer? If so, you will probably want an I-PAC interface, which will make your computer see your stick(s) as a keyboard that is then easily recognized and mapped within your software. This is similar to the approach taken by X-Arcade and other PC-only arcade sticks. These control units are a mainstay of the DIY MAME cabinet crowd.

If, however, you play on a console such as the XBox 360, you might prefer doing a "pad hack" whereby you connect your arcade buttons to the circuit board inside of a console controller. This is what I chose to do because it allows me to use my sticks on my PC *and* on my friends' XBox consoles (thanks to the XBox's use of USB for their controllers). This method is a little more intense than using an I-PAC because you'll need to have a steady hand and some experience with soldering, but it's not terribly tough if you take it slow and exercise some care.

B. Which hardware do you want to use?

When it comes to arcade hardware, one size does not fit all. There is incredible diversity among sticks and buttons that varies by manufacturer, region (Japan vs America) and games that are intended to be played. For example, many competitive Street Fighter players prefer (to put it mildly) Japanese-style sticks (especially Sanwa), while Pac Man pros usually opt for ball-top American-style sticks. Furthermore, Street Fighters usually choose Japanese-style buttons, which are convex and have a shorter throw compared with American-style buttons. I recommend doing your homework and clocking in some time with a few different sticks before you make your choice because it's totally up to individual preference.

I grew up using Happ bat-top sticks and Happ's clicky, concave buttons in the local arcade, so that's what I went with. I purchased them from Tornado Terry on eBay at a really great price.

C. What kind of button layout will you use?

The button layout is almost as personal and important as the hardware selection, so again, you'll want to do your homework and try out a few things before making any major moves. Some prominent stick-makers are using an eight-button layout with four buttons in two rows (as in the Mad Catz Tournament Edition stick), but I often get lost on this configuration and end up accidentally scooting over to the wrong buttons during the more heated moments.

Again, Japanese- and American-style button layouts differ, with Japanese-style layouts having a staggered positioning that mimics the way your fingers naturally fall, while American-style layouts are straight across.

Slagcoin.com has a pretty great collection of sample layouts that you can use or you can modify one of them to create a unique layout that's all your own, which is what I did:

(since I modified it, the measurements may not all be accurate, so you're probably better off printing it out and working directly with the template if you plan to use this one)

I went with a Japanese-style stagger because I find it to be more ergonomic. Additionally, since I emulate a lot of Neo Geo games, I wanted to have four buttons in one of the rows to recreate that feel but not on both rows to avoid confusion. This fourth button in the bottom row also works perfectly as the 'run' button in certain Mortal Kombat games.

D. What materials do you want to construct your stick out of?

This is where you can really put a visible, personal touch on your creation and make something that is instantly identifiable. Arcade sticks are pretty much just boxes that you screw things to, so you can build a box from scratch using high- or low-quality materials, or you can repurpose a box from somewhere else to give your stick a "found materials" kind of look. I won't delve too deeply into this aspect of the construction process since I'm a shitty carpenter and you can definitely find more complete and informative guides to box-building elsewhere online.

I wanted something large, sturdy and attractive enough to leave in my living room, so I opted for a combination of red oak top and two sides paired with high-quality plywood (from the 'project' section of Lowe's, not that splintery shit from the lumber section) for the bottom and other sides. I then stained it with a dark stain and covered it with several coats of shellac, which made it look like an antique piece of furniture.

It didn't turn out perfectly due to my aforementioned shitty carpentry skills, but it passed the wife test so it's good enough for me.

Page 1: Building an Arcade-style Fight Stick
Page 2: Assembling Your Box
Page 3: Pad Hacking
Page 4: Installing the Hardware
Page 5: Conclusions and Helpful Links

Cari Farmasi

Farmasi Di Kuala Lumpur dan Selangor Selangor / KL Area NO SHOPS NAMES ...