Showing posts with label ssf4. Show all posts

Thursday, February 21, 2013

How to Swap Stages in SSF4AE

With a lot of new stages being backported from SFxT and some brand new stages from mugenlove100, Alff suggested I write a tutorial on swapping around stages. It's a very simple process but it requires a hex editor, which makes some people uncomfortable. I use the free and open-source Frhed, which is somewhat limited in functionality but is thankfully quite simple to use. As a general note, stage mods are often built from the Training Stage (abbreviated as TRN), but I'll be using one that started from the Brazilian Jungle stage, or BRA. For reference, here's a key that shows which abbreviations go with which stages:
Key image courtesy of Jaldaboath :)
So, to get started, we'll first want to make backups of the stage we're going to replace. Personally, I hate the Crumbling Laboratory stage, so I copy those files to a safe place. Then, take your stage mod files, in this case BRA.emz and BRA.tex.emz, and open them each in your hex editor, like this:
Next, use the find-and-replace function (the standard shortcut for this is ctrl+H; you'll have to do it in each of the modded stage files) to replace each instance of BRA (or TRN if the mod is based on the Training Stage) with the 3-letter prefix of whichever stage you wish to replace, in this case LBX:
Click the button to replace all following occurrences and it should pop up a message telling you how many instances were replaced (it's generally a much larger number for the ***.emz files than for the ***.tex.emz files, FYI).

Once that's done, just save it and close, then rename the modded stage to match the 3-letter prefix you just swapped in. In this case, I change BRA.tex.emz > LBX.tex.emz and BRA.emz > LBX.emz.

Now you just copy those modded stage files into your [install dir]\resource\battle\stage directory and overwrite what's already there. Just make sure you backed up those original files first, in case you change your mind later.

UPDATE: If you would rather not overwrite any of the files, there is a way to supersede the original stages in a non-destructive way. Instead of adding your modded files to the above directory, instead go to [install dir]\patch 1a\battle and create a new directory named 'stage'. Put your modded files in there and the game should use them instead of the originals. (thanks to Nemesys_Syndrome for the tip)

That's it. You're done. Now, go try it out and make sure it works :)

Wednesday, October 31, 2012

Fix for Win8 Unhandled Error -1 (SSF4)

Ugh, this problem was infuriating. I got a cheap copy of Windows 8 through my job and decided to go ahead and install it, just to be up-to-date. Then, I went to play SSF4AE via Steam and instead of launching, I got an ugly little window that said "An unhandled error has occurred -1."

After digging around online, it appears that the fault lies in Windows 8's default implementation of Games For Windows Live. |:-[

To get around this problem, we need to uninstall the default GFWL and download the latest installer from Microsoft.

You DO NOT have to uninstall/reinstall Steam as is suggested elsewhere online. If you try that, be aware that it will may uninstall all of your games at the same time (thanks to MasterPhW for the correction). It's supposed to ask before doing so, but it didn't ask me, so YMMV.

Monday, March 12, 2012

Beginner's Guide to Custom Challenges using Waterine's ClgEditor


This tutorial will cover the very basics of using Waterine's ClgEditor tool to create your own combo challenges for SSF4AE. For this, we will need the ClgEditor and Dantarion et al's Ono! Editor.

When you first run the ClgEditor, click the button to 'Open...' and browse to your installation directory (usually C:\Program Files (x86)\Steam\steamapps\common\super street fighter iv - arcade edition), then go to ...\resource\battle\chara and go into the folder for the character whose Trial Mode you wish to modify. It should filter the folder contents such that the only file displayed is our desired CLG file, in my case, CMY.clg.


Once the file is loaded, you can see the list of challenge levels on the left. At the top of the window you should see a pulldown menu labeled 'Ultra Selection,' which lets you select which Ultra combo should be loaded for the challenge, and another pulldown labeled 'Target State,' which determines how the dummy (Dan) should act (for use with situational combos, like ones that must start with a counterhit or only work on jumping opponents).

The area underneath those pulldowns is where most of the fun happens.

In the 'Scripts' section, the first button from the left (looks like a sun) creates a new command, either an 'attack' or a 'script,' which you can choose between using the 'Criteria type' pulldown menu to the right. Attacks are just your normal actions while scripts are movement actions, like dashes and FADCs.

The 'Criteria indices' field tells the game which moves it should accept as a successful command. If any strength of a move will do, as is the case with many of the early challenges, you must include each index that fulfills the criteria. For a regular special move (light, medium, hard and EX), you would need entries for all four strengths.

Back in the scripts window, each command represents one discreet portion of a challenge, and you can show up to 8 on the screen. You can go beyond 8 in the list, but unfortunately the display doesn't scroll in-game, so the player won't be able to see the rest.

To the right, you can choose what on-screen instructions and input help to display from the respective pulldown menus.

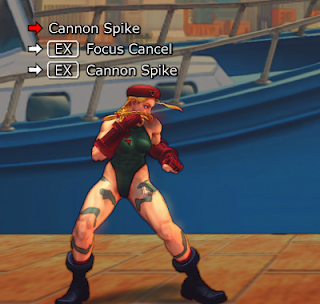
So, lets say I want to change Cammy's first challenge from a simple Spiral Arrow to a Cannon Spike > FADC > EX Cannon Spike.

Step 1. Select the first trial from the levels list and hit the 'X' button under Scripts to delete the existing command. Then, click the sun button to create a new command. Our first command--Cannon Spike--is an attack, so choose that from the Criteria type pulldown.

Step 2. Next, we need to fill in the Criteria indices field with the indices for the move (I cheated and stole them from Challenge #3), in this case, 100, 101, 102, 103, 104, 105.

Step 3. Under 'On-screen command text's last pulldown menu, we want to select Cannon Spike, and under 'Help menu command text's last pulldown menu, we want to select Cannon Spike Input.

Great! There's our first command. Now, we need to make another.

Step 4. Click on the sun button again, but this time we're going to use a movement script, so select 'Script' from the Criteria type pulldown.

As in step 2, fill in the Criteria indices field with the appropriate inputs, in this case 325 (I stole that from a later challenge, as well; are you seeing a pattern here?).

Likewise, we'll fill in the On-screen command text and Help menu command text, which are a little weird for FADCs: in the first pulldown under On-screen commant text, choose 'EX,' and under the third pulldown, choose 'FocusCancel.' Then, under Help menu's first pulldown, choose 'EX' again, and under the third, choose 'MP+MK.'

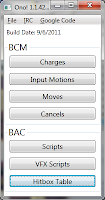
Step 5. Alright, moving right along, click the sun button one more time and choose the 'Attack' criteria. Up until now, all of the moves we've wanted to use could be easily pilfered from other challenges. However, no challenge requires an EX Cannon Spike specifically, so we'll have to figure this one out on our own. To do it, open up the Ono! Editor and open Cammy's BCM file. You should see a window that looks something like this:

Click on the bottom button, labeled "Hitbox Table." It should open a new window that looks something like this:


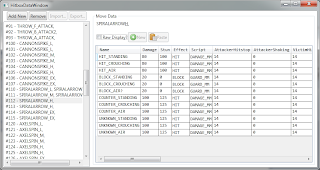
There's a lot of really great information available in this window, but we really only need the numbers on the far left in front of the move names. So, scroll down until you find your desired move, in my case EX Cannon Spike, which is listed under #106 and #107. If the criteria type is an attack, you use the hitbox data number, if it's a script, you should use the script number (you can expand the header info in Ono! to see it).

Now, enter those numbers into the Criteria indices field, separated by commas and spaces as necessary.

Fill in the appropriate on-screen command and help menu text, and you should be all set. Click the save button and lets go check it out by copying it into our ...\resource\battle\chara\CMY folder (don't forget to make a backup!!).


Now, as a note, you can make your combos against any version of the characters' movesets you like (Super is the default, of course, but you can use movesets from AE, 2012 or even custom movesets created in Ono!), you just have to copy the appropriate BAC/BCM files into the ...\resource\battle\chara\*** folder to overwrite the ones that are already there.

If you create something cool, be sure to share your work with the community, and always always always make backups!

Wednesday, October 20, 2010

How to Extract SSF4 Data From an Xbox 360 ISO

For people who want to get into using files from Super Street Fighter 4 on Xbox 360 with their PC version of vanilla Street Fighter 4, you have to go through a number of steps that have never been appropriately documented, so here goes:

1. Collecting the right tools for the job

First off, you need a copy of SSF4 in ISO format. I don't want to know how you get it, but I recommend purchasing it and then ripping it to your PC using the 'hot swap' method.

Next, we need a copy of isoextract, which extacts the data from the 360 disc image. You can download it here or here.

We also need QuickBMS, a script-based file extractor written by Luigi Auriemma, as well as a script to use with it. You can get QuickBMS here and the extraction script here or here.

2. Extracting the ISO

Open up isoextract and you should see this screen:
Using the buttons on the upper-right, click on 'choose ISO-folder' and navigate to the directory where your SSF4 ISO is stored. Next, click on 'choose destination' and select a directory where you want your extracted files to reside.

Then, just click the big button marked 'go' down in the bottom right.

Now, once it's all finished, if you navigate to your extraction directory, you'll find it has created a directory structure from the disc. Go to archive > battle and you should see a file named 'battle.eaf.' This guy has all of the goodies, so we gotta get them out using QuickBMS.

3. Extracting the files

Open QuickBMS and it should pop up a console window like this:
It should also automatically pop up an explorer window, which you can use to navigate to the QuickBMS script we got back in Step 1.

Next, it will pop up another explorer window, which we will use to navigate to our battle.eaf file.

Then, it will pop up a final explorer window, which we will use to select our output directory. I just chose that same 'battle' directory.

Now, back in the console window, you should see a whole bunch of output stream by, listing the files that are being extracted.

That's it. You're done. You should have a complete file structure available now, with access to all of the proper files, including character and stage data. Most of this can be opened with the latest version of piecemontee's Asset Explorer, using the new support for big-endian files.

Cari Farmasi

Farmasi Di Kuala Lumpur dan Selangor Selangor / KL Area NO SHOPS NAMES ...