Showing posts with label sensibeat. Show all posts

Monday, September 19, 2011

SSF4AE - Swapping Static Objects with sloth86's Tools

Swapping static objects with sloth86's tools.
copyright sensibeat

sloth86's toolshttp://aemods.pbworks.com/w/page/42053948/aetools#Sloth86sModelSwapTools

piecemonteeSF4explorerV0.37b.exehttp://sf4viewer.sourceforge.net/

With this method you can only swap static objects assigned to 1 bone.

First chose a .obj you want to swap:


Chose a character and extract the full model as a .obj with sf4explorer:


You'll have to edit the model in your 3D editor to fit the character:


¤ More infos about that part here: http://filthypants.blogspot.com/2009/08/beginners-guide-to-sf4-model-editing.html

¤ To open the .obj in 3ds max you may need to open it and save it in misfit model 3d first.

Now you have your model in place save it and open EMG2SMD.exe:

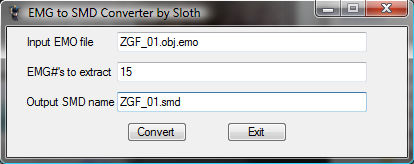
I want to swap my cap with zangief's hairs (15th #EMG -as viewed in sf4explorer-)

Open the smd in notepad and look for the number of the bone you want to link your object to:

in that case I want to link to the "head bone": #6.

¤ More infos on smd here: http://developer.valvesoftware.com/wiki/Studiomdl_Data

Now you can use OBJ2EMG.exe:

¤ To use a .obj from 3ds max in OBJ2EMG you may need to open it and save it in misfit model 3d first.

Then use EMGSWAP.exe:


We aren't done yet, it needs some textures (diffusion+normal map dds):

¤ See other tutorials to add dds to your col.emb and nml.emb...

Then use DDSREFEDIT32.exe (I renamed former new.emo to ZGF_01.obj.emo before this step):


That looks OK in sf4explorer:


Let's test in game:


edit:
I thought the bone ID# was in hexadecimal in the smb... it's in decimal sorry for the confusion, I erased that part.
You actually need to write it in hexadecimal when you do it manually, we'll see that in another tutorial...

edit 2: I knew I forgot something...

I didn't linked any material features in the .emm to my "mcap"

2 ways to do it:
1) the lazy way: edit the obj.emo in hexadecimal and change "mcap" by a material that could do the trick like "shoes" or "pants"

2) using NanjouJ's matedit tool, replacing an unused material (in that case "hair") by "mcap" and the features you want to use on it.
http://aemods.pbworks.com/w/page/42053948/aetools#NanjouJsMaterialsTool
UPDATE: use sloth86's EMMEdit instead. It's much easier.

Here's the final result with material features added (no more weird reflections):

Thursday, July 7, 2011

Sensibeat's cmn File Size Editing Tutorial (Also Applicable to Other emz Bundles)

cmn.emz file size editing tutorial

So now we want to copy some file in our cmn.emz.

We need the Length of the file.
Calculate it or easier, just open the file in the hexadecimal editor, the last offset number is our Length.

I want to "inject" an edited HWK.fce.ema


Last offset is 7BA97 so our Length will be 97 BA 07 00

Note that it's smaller than ZGF.fce.ema but it works the same with bigger files.

Now let's find the ZGF.fce.ema location (search works well too but let's use our new knowledge)
TB = 9C5C28+38 = 9C5C60
The true beginning of the #EMA is at offset 9C5C60
[IMG]

I select the full file


I overwrite it with the HWK.fce.ema file


I insert blanks (00) to make the next #EMA begin at the start of a line (like it was)
[IMG]

Now I know there are 3 files after the one I inserted (Thx to piecemontee's AE) that were moved by my changes.
I need to check the TBs of the #EMA #BAC #BCM + the TBs of the files at the end:

#EMA TB: A41700
A41700 - 40 (CL) = A416C0 (RL)


#BAC TB: A5B6A0
A5B6A0 - 48 (CL) = A5B658 (RL)


#BCM TB: A826B0
A826B0 - 50 (CL) = A82660 (RL)


ZGF.skl.emo TB: A843E0
ZGF.skl.emm TB: A843EC
ZGF.obj.ema TB: A843F8
ZGF.fce.ema TB: A84404
ZGF.cam.ema TB: A84410
ZGF.bac TB: A8441C
ZGF.bcm TB: A84424

We need to enter the Length of the new fce.ema (other lengths didn't change), and new RLs and TBs backwards:


Et voilà.

Sensibeat's Model Swapping Tutorial (Updated)

NOTE: These steps are generally unnecessary now because sloth86's EMGSwap tools have automated the process. However, this tutorial remains a very useful reference and can still be necessary for edge-cases in which sloth86's tools may not work properly. Otherwise, this post will remain for documentation/posterity.

Updated Version:

Swapping objects (SSF4AE)
 I'll swap cammy's first costume hat with the 2nd one.

In sf4explorer I open CMY_02.obj.emo and I "raw dump" (not "extract") the #EMG (cap_lether) (cap_line)

(I name it CMY_02.cap.emg)


I open CMY_01.obj.emo and CMY_02.cap.emg in HxD

In CMY_01.obj.emo I search for the #EMG (F3) containing the "cap"

(note the offset: 670C0)

I go to the next #EMG (F3)


I place the cursor just before that #EMG and I use the "select block" fonction (CTRL+E) using the start offset I noted (670C0):


OK:


(Note the Length: 63F0)

The #EMG selected in CMY_01.obj.emo, I now "Select All" (CTRL+A) CMY_02.cap.emg and I copy it (CTRL+C).


(Note the Length: 50C0)

I paste it (CTRL+V) over the #EMG selected in CMY_01.obj.emo


OK:


Let's do some math in hexadecimal:
Code:
63F0 (Length of former #EMG) - 50C0 (Length of new #EMG) = 1330
1) I need to substract 1330 in the index at the start of the file for every offset of the #EMGs for every object coming after the "cap", as the new object is smaller than the old one.


By opening CMY_01.obj.emo in sf4explorer, I can count that the cap is the 10th #EMG so I have to substract 1330 from the 11th #EMG to the last one (22th #EMG).


The index of the #EMGs starts at offset 28
From there each block of 8 digits is the offset of one #EMGs minus 30 written backwards 2 digits at a time ("little endian"):
01 23 45 69 in little endian will be 69 45 23 01 in big endian

So I'll have to edit the 12 index entries from offset 50 (#EMG 11) to 7F (#EMG 22)
I substract 1330 to the offsets (calculating in hexadecimal and reading offsets in "big endian"):
Code:
00 06 D4 80 - 1330 = 00 06 C1 50  00 06 E4 50 - 1330 = 00 06 D1 20  ...  00 0A F1 60 - 1330 = 00 0A DE 30  
And I rewrite them backwards ("little endian")


2) I need to substract 1330 to 2 more offsets related to the 2nd part of the obj.emo file:

Code:
00 0C A7 00 - 1330 = 00 0C 93 D0  00 0C A5 90 - 1330 = 00 0C 92 60  


Let's go to the 2nd offset (minus 20 written backwards, so 00 0C 92 60 + 20 = 00 0C 92 80), using the goto fonction (CTRL+G):


Here's another index I need to substract 1330 to:


From offset C9280 to C92D7, just before the first readable datas (hand_env):

Code:
00 0C A5 E8 - 1330 = 00 0C 92 B8  ...  00 0C A6 D1 - 1330 = 00 0C 93 A1  


Save and that's it for the 1st part:


Next I'll show how to add dds to the col.emb and nml.emb files and how to link objects in the obj.emo file to the right dds.

1) Adding dds to the col.emb (and nml.emb) files

In sf4explorer, I extract the dds for the cap from CMY_02_01.col.emb
That I name CMY_02_01.dds:


I open CMY_01.col.emb and CMY_02_01.dds in HXD


In CMY_01.col.emb, I add a line of "00" at the end of the index, here:


I change this "04" at offset 0C (former number of dds):


Into "05" (new number of dds):


And I edit the index because I moved all the offsets by 10 with my line of "00":


I add another line of "00" at the end of the file, here:


(Note the starting offset of the new dds will be: 155850)

I "select All" (CTRL+A) CMY_02_01.dds and copy it


(Note the Length: 555F0)

I paste it at the end of the file (after the line of "00"):


Then I go back to the start of the file to enter the starting offset of the new dds minus 40 writen in "little endian"
(40 = offset where I'll write the new index entry)
00 15 58 50 - 40 = 00 15 58 10 ("big endian")
That gives in "little endian":


Now I add the new dds length written in "little endian" (00 05 55 F0):


Save and do the exact same thing with the normal map dds in CMY_01.nml.emb, adding the normal map dds that contains the cap from CMY_02.nml.emb

2) Linking objects in the obj.emo file to the right dds

dds are ordered from 0 and the normal map dds follow the texture dds, so if you add 1 texture dds, every normal map dds will change number.
I have now 5 texture dds from #0 to #4
and 5 normal map dds from #5 to #9

I open CMY_01.obj.emo in HxD and do a search on "#EMG" (F3)
Each #EMG has those kind of data outlined here:


They contain the links to the dds:


The numbers in red are links to the texture dds
The numbers in green are links to the normal map dds

I have to change all the links to the normal map dds for the 22 #EMG according to the new order of the dds
(I just have to add 1 to every normal map link as we added 1 texture dds)


And edit the "cap" #EMG to link it to my 2 new dds #4 and #9:


Save and it's over.


Original Version:

Let's put Ryu's hairs on Akuma's (a.k.a. Gouki).

preparation:

From GKI_02.obj.emo I dump and rename (included in swap obj.rar):
  • GKI_01.bsr

  • GKI_01.nml.emb

  • GKI_01.shd.emo
They'll be used in kensou's sf4tool to repack the file.

From RYU_03.cos.emz I dump the hair emg file that I rename as RYU_03.hair.emg (included in swap obj.rar):


Open GKI_02.obj.emo and RYU_03.hair.emg in HxD:
The hair being the last emg of GKI file, we can get the information on it's beginning and ending from these:


Code:
offset 24 = offset of the list of offsets of names following the last emg:
00 0B A2 70 + 20 = 00 0B A2 90 so the emg finishes at 00 0B A2 8F (1 before)
offset 58 = 1st offset of last emg (hair): 00 0A 68 D0 + 30 = 00 0A 69 00

Let's use the "Select block" option in HxD:


Now select all of the RYU file and copy/paste it over GKY's selection:


OK:

Notice the 2 offsets that will need to be rewritten at the beginning of the file:

Code:
00 0C 01 70  -20 = 00 0C 01 50  -> backwards: 50 01 0C 00 @ offset 24
00 0C 02 20 -> backwards: 20 02 0C 00 @ offset 10

Then the 2 offsets at the beginning of the file:


So it's good for the emo's references.


Now let's take a look at the emg's references:

43 -> former emg is 42
01 -> number of the 2nd texture dds
05 -> number of the 2nd normal map dds

Save and Rename the file as GKI_01.obj.emo

Put it in a new folder with:

  • GKI_01.bsr

  • GKI_01.nml.emb

  • GKI_01.shd.emo
and only those 4 files.

Open kensou's sf4tool and go look for your file path in the upper right, then click the left button under the big window:


Notice the files obj.emo and shd.emo are swapped.
Rewrite them in the right order (obj before shd) and click the right button:


Done.

Rename the newpack.emz into GKI_01.cos.emz and test it ingame with the GKI_01_01.col.emz provided (2nd costume 1st color file edited to be played as 1st costume):


You've got Akuma with Ryu's hairs.

For swapping smaller objects:

Basically you just have to copy/paste your emg and fill the rest of the former emg with 00's. Then there're just the emg number and the dds references to change. So the swap can be done on the .cos.emz directly.

Cari Farmasi

Farmasi Di Kuala Lumpur dan Selangor Selangor / KL Area NO SHOPS NAMES ...