Before I get to the review, I'd like to give a bit of background to clarify my level of experience and explain my situation. If you don't want to read it, you can skip straight to the actual review, labeled in red down below. Also, gratuitous tube pr0n is down at the bottom of the post. ;-)
My piece of crap solid-state, Sony 5.1 receiver has finally died after nine years of service and, rather than replace it with an equally crappy updated model, I decided to take the plunge and drop a few hundred more bucks on my first tube amplifier. I have read quite a bit on audiophile forums and, while I have never really bought into their pseudoscientific bullshit, I was intrigued by their insistence that tube amps (also known as valve amps) are in a whole different category from their transistor-based cousins.
I am no stranger to a hot soldering iron, so I looked at a number of DIY kits, including a remake of the venerable Dynaco ST-70, which ranged in price from approximately $250 to $700. While the DIY route would have certainly been a great learning experience, one has to weigh the benefits (education, fun, cost-savings) with the potential risks (added costs due to the inevitable mistakes, frustration, potential failure). In the end, I decided it was more likely to actually cost more to go DIY, so I started exploring alternatives.
Overall, new valve amps from well-respected brands start at approximately $1,500, which is much greater than my budget of roughly $600. Within this price range, I basically had two options: buy a used entry-level amp from a well-known, reputable company or take a risk on one of the ultra-low-cost Chinese-built amplifiers that can be found online (e.g., Music Angel and Yaqin).
Side note: For anyone who is taking their first steps into high-end audio, the best places to look online appear to be eBay and AudiogoN. Out of the two, I think AudiogoN is a better place to find good deals on solid equipment. The crowd there is highly knowledgeable and I think you are less likely to get stuck with non-functional equipment than if you purchase from eBay.
I kept my eye on both eBay and AudiogoN looking for anything that fit my criteria. On eBay, I was drawn to the Yaqin MC-100B, which utilizes 6sn7 preamp tubes and the very popular KT-88 output tubes. This amp was available from two sellers, one from Hong Kong for approximately $700 after shipping and one from Canada for approximately $800 after shipping. The one from Canada also does quality assurance testing, which is apparently the main concern with the Chinese amps, so anyone looking into this amplifier should strongly consider spending the extra hundred bucks just for peace of mind and ease of support should the need for repairs arise.
Just when I was ready to take the plunge on the MC-100B, I came across an interesting alternative: a seller on AudiogoN was offering a demo unit of the Dared VP-20 for $590 (the official retail price is $1,300, but I suspect this price is inflated to make the actual selling prices seem extra-low; I have seen brand new units for only ~$100 more). This amplifier, which uses both the 12AX7 and 12AU7 preamp tubes and 6L6G output tubes, is a strange beast in that it sits somewhere between the traditional integrated and monoblock options. The two channels are separated from one another but they are tethered to and share a single power supply, which is intended to reduce interference while saving on the cost of additional power supply components.
I only found
one review of this amp online and it seemed a little overly effusive for its supposed objectivity, so I didn't place too much trust in it. This left me with essentially no prior guidance on the amp's quality, regarding either sound or craftsmanship. I was encouraged, though, by Dared's use of audiophile-quality capacitors, gold-plated jacks and gold-printed circuit boards. Furthermore, the amp is built with an auto-biasing circuit, which apparently makes tube rolling as easy as plugging in a toaster (i.e., no mucking around with multimeters and tiny screwdrivers).
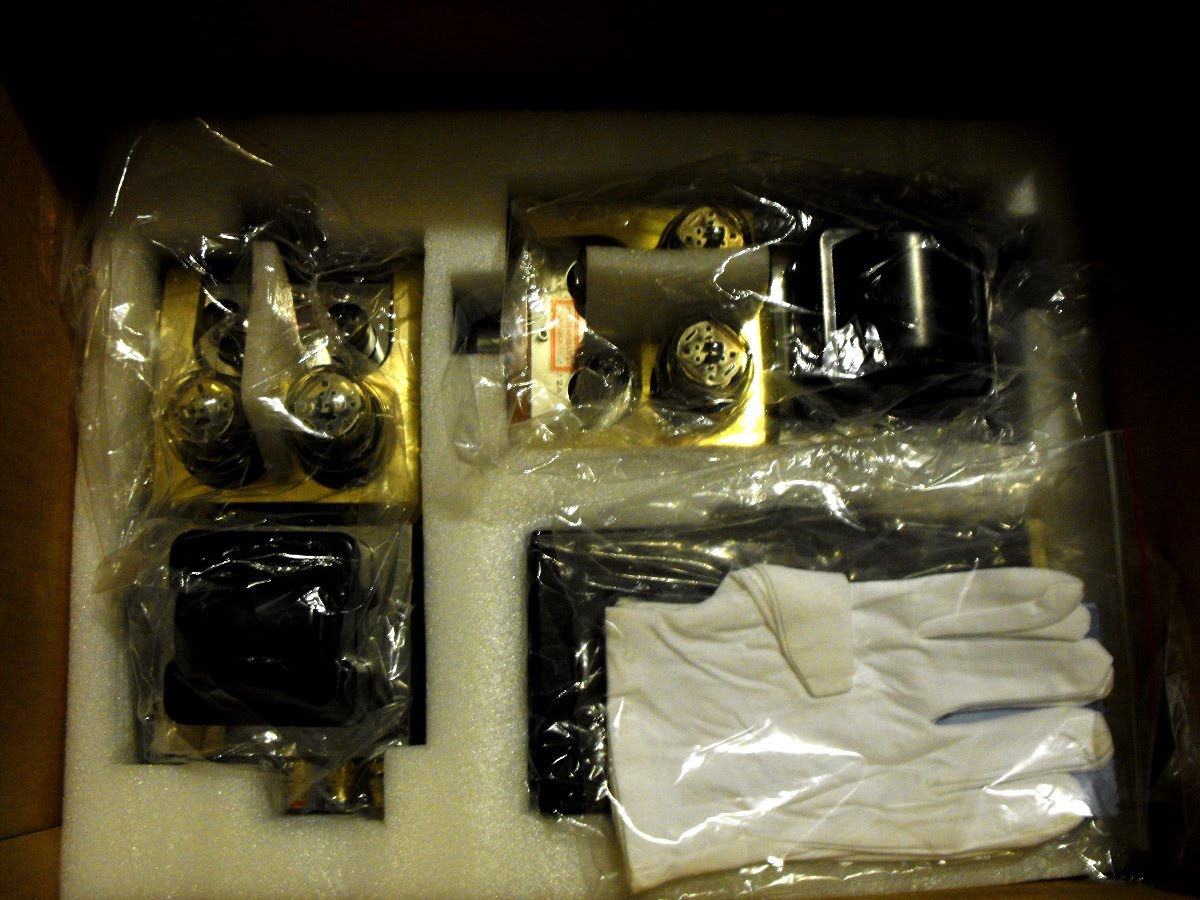
Now for the reviewI decided to go for it and the seller, who is apparently(?) Dared's North American distributor based out of Illinois, was very helpful and patient when dealing with my many questions. He accepted my offer and three days later, the amp was delivered to my door via FedEx. It was double-boxed and then packed into a fitted foam block:

The tubes were not separately packed, which was a bit of a disappointment, but overall, the packing was very secure and it was clear that nothing had moved around during transit.
In addition to the amp, the box came with several of the usual goodies, including a pair of white gloves, a microfiber cleaning cloth and a cleaning brush, along with a run-of-the-mill power cord, two meaty cables to connect the quasi-monoblocks to the shared power supply and--inexplicably--a USB-A to USB-A cable (I'm still not sure why this was included, but I suspect my unit was mistaken for another one from the same seller that comes with a simple USB DAC):

The first thing I noticed upon pulling the actual amp units out of the foam was its mass and solidity. The pieces felt very sturdy in my hands, and I have absolutely zero complaints about build quality. Where I had expected plastic and/or cheap metal, I found polished stainless steel and gorgeous, natural wood. There were quite a few fingerprints on the units, but I didn't mind since it was a former demo unit and they were easily polished out with the included cloth.

On the back of the blocks, you can see the gold-plated RCA and speaker jacks:

This amplifier will push either 8 ohm or 16 ohm speakers, depending on which speaker jacks you plug into. Unfortunately, the speaker jacks do not appear to be labeled, unlike most every other opening on the amps, so I just *guessed* that the signal jacks to the left of the ground jack was the 8 ohm on both sides... Everything appears okay so far, so it looks like I guessed correctly.
Another puzzling oversight is that the back of the power supply unit has both output power jacks labeled with the identical "To Right Amplifier":

Once I got everything plugged up and connected to my speakers (Phase Technology Teatro 7.5s; now discontinued, but
you can find out more about them here), I flipped the switch on the front of the power supply and watched the tubes spring to life:

Before attaching any signal to the amp, I turned the integrated volume pots to approximately 40% and listened for any noise, hum, etc. I heard absolutely
nothing, even with my ear right up against the tweeters. That may change at higher volumes, but I didn't want to overload anything before I even got started, so I didn't turn it up any higher.
I connected my CD player, an unremarkable 301-disc changer from Pioneer, and selected a recording of Dvorak's "New World" Symphony. I was immediately blown away by the clarity of this amp. I don't have any prior experience with tube-based hi-fi, so I can't say how the amp compares to other valve amps, but I can honestly say it is far better than any solid state amp I have encountered. Compared with my old receiver, listening to this amp felt like I had cleaned my ears out! I could suddenly hear the most amazing minutae, including musicians shuffling in their seats and flipping pages in their sheet music.
Furthermore, the amp puts out just 18 watts per channel, which is a far cry from the 100 watts x 5 channels that my older solid state receiver put out. Before my purchase, I was apprehensive that the amp simply would not get loud enough for comfortable listening anywhere except for right in front of the speakers, but it does just fine. My speakers have a sensitivity of 90 db, which is better than most low-quality bookshelf speakers but worse than many higher-end speakers (and much worse than the often-gigantic "high sensitivity" speakers), and I found that turning the volume to approximately 50% on my preamp (a solid state
Gemini PA-7000 Professional) and approximately 50% on each amp block is loud enough to hear throughout my house and too loud to comfortably listen to directly in front of the speakers.
Next, I put on the first track from Pink Floyd's Atom Heart Mother, an epic 20-minute song that includes the usual guitar, bass, keyboards and drums, as well as a brass section, a full chorus and horses(!). What struck me most while listening to this track was that I lost the sense of sounds reproduced by a pair speakers. Instead, with my eyes closed, I felt like I could point to the individual band members in the room with me. Rick Wright's haunting keyboards drifted in from the left behind the bookshelf, while Dave Gilmour played from somewhere in the vicinity of my kitchen sink. I believe in audiophile parlance, this is known as the 'soundstage,' but don't hold me to that. When the brass kicked in, I thought I heard some distortion, but it was actually just the way brass instruments sound. I had become so used to hearing that part of the song through my muddy solid state system that it took me a minute to remember how the instruments actually sound in person!
For frequency response, the highs are extremely crisp and the lows are rich without the booming I had become accustomed to with my older 5.1, subwoofer-driven system. Since my initial listening test, I have attached my powered subwoofer to the second output of my preamp to add a little more bass to it, but this is just a personal preference and many "experts" would probably say it's too much.
After the Pink Floyd, I listened to some Yes and was impressed by how distinct the layering of their instrumentation was. It's now possible for me to mentally separate each layer of the vocals instead of just hearing the harmonized mishmash.
After that, I put on Chris Isaak's Baja Sessions, which was a great match for this amp. I never expected to hear the sound of fingers on guitar strings and drumsticks bouncing off drum heads, but it's all there, lending a sense of realism that defies description. Now, to be honest, how much of that is unique to this amp and how much is just an effect of moving from solid state to tubes, I can't say. What I
can say, though, is that I am now rediscovering my music in a way I never thought possible. I feel like when I got my first pair of prescription glasses; like I am finally privy to an entire world of beauty and crisp resolution that was heretofore hidden just out of reach.
Other ThoughtsA lot of folks online have mentioned that the Chinese tubes that come in these amps are terrible, but they sounded fine to me. Luckily, all of the tubes are available for relatively low prices online and I plan to try out quite a few. I'll post my results here whenever I do.
If anyone has any questions about anything in this post, including specific questions about the amp and/or choosing a first tube amplifier, feel free to leave a comment.
Now, on to the tube pr0n: