Monday, September 19, 2011

SSF4AE - Swapping Static Objects with sloth86's Tools

Swapping static objects with sloth86's tools.
copyright sensibeat

sloth86's tools: http://aemods.pbworks.com/w/page/42053948/aetools#Sloth86sModelSwapTools

piecemonteeSF4explorerV0.37b.exe: http://sf4viewer.sourceforge.net/

With this method you can only swap static objects assigned to 1 bone.

First chose a .obj you want to swap:


Chose a character and extract the full model as a .obj with sf4explorer:


You'll have to edit the model in your 3D editor to fit the character:


¤ More infos about that part here: http://filthypants.blogspot.com/2009/08/beginners-guide-to-sf4-model-editing.html

¤ To open the .obj in 3ds max you may need to open it and save it in misfit model 3d first.

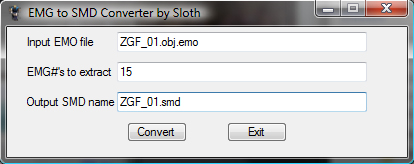
Now you have your model in place save it and open EMG2SMD.exe:

I want to swap my cap with zangief's hairs (15th #EMG -as viewed in sf4explorer-)

Open the smd in notepad and look for the number of the bone you want to link your object to:

in that case I want to link to the "head bone": #6.

¤ More infos on smd here: http://developer.valvesoftware.com/wiki/Studiomdl_Data

Now you can use OBJ2EMG.exe:

¤ To use a .obj from 3ds max in OBJ2EMG you may need to open it and save it in misfit model 3d first.

Then use EMGSWAP.exe:


We aren't done yet, it needs some textures (diffusion+normal map dds):

¤ See other tutorials to add dds to your col.emb and nml.emb...

Then use DDSREFEDIT32.exe (I renamed former new.emo to ZGF_01.obj.emo before this step):


That looks OK in sf4explorer:


Let's test in game:


edit:
I thought the bone ID# was in hexadecimal in the smb... it's in decimal sorry for the confusion, I erased that part.
You actually need to write it in hexadecimal when you do it manually, we'll see that in another tutorial...

edit 2: I knew I forgot something...

I didn't linked any material features in the .emm to my "mcap"

2 ways to do it:
1) the lazy way: edit the obj.emo in hexadecimal and change "mcap" by a material that could do the trick like "shoes" or "pants"

2) using NanjouJ's matedit tool, replacing an unused material (in that case "hair") by "mcap" and the features you want to use on it.
http://aemods.pbworks.com/w/page/42053948/aetools#NanjouJsMaterialsTool
UPDATE: use sloth86's EMMEdit instead. It's much easier.

Here's the final result with material features added (no more weird reflections):

Friday, September 16, 2011

Reinstalling GRUB2

This has come up a million times (every time I reinstall Windows, in fact), and every time I have to search around online and try to remember how to do it. I figured this most recent time that I would just go ahead and write a blog post about it and be done with it, so here it is.

According to this handy page from the Ubuntu community documentation, there are a couple of ways to skin this particular cat. The one that worked best for me was to take an Alternate CD that I already had on-hand, boot into it, and choose 'Repair an Existing Installation' (or something like that) at the first splash screen (the one where you can check the CD integrity, run memtest, etc.).

Once it gets started, run through the options choosing the default keyboard layout, time zone, etc. When it asks you to choose a root, accompanied by a list of all of the HDD partitions, it appears you may choose any of them (I chose /dev/sda5 on this particular machine, which has Win7 in a primary partition and Ubuntu spread across 3 logical partitions). Then, once it kicks you to a command prompt, type:
sudo grub-install /dev/sda
That's it.

Other easy options that I didn't try include booting into a LiveCD session, then installing and running the boot-repair package (it didn't even show up in the apt-cache when I searched for it, so YMMV). In the program, choose the "First Repair" option and then reboot without the CD in the drive. A GRUB splash should show up proposing both Ubuntu and Windows.

Thursday, September 15, 2011

Windows 8 Dev Preview on Lenovo X61 Tablet

I downloaded Microsoft's Windows 8 Developer Preview the other day and decided to try it out on my Lenovo X61 tablet PC. NOTE: This is an older X61, running the Centrino Pro chipset (an older Core2 series chipset). For newer models, you might need to run Windows Update after installing to enable pen/touch input (thanks to reader taytor head for the info).

The trackpoint/eraserhead/navigation nipple/whatever works fine from the get-go, but the middle-button mousewheel emulation does not. It's easily fixed, though, by downloading and installing the driver from Lenovo. After this easy fix, though, I started running into some problems.

First off, my Centrino Pro chipset (Intel Mobile GM965 Express) graphics driver wasn't recognized by default, and every time I tried to install it manually, it failed with an error claiming that the chipset wasn't valid for the driver.

Knowing this to be false, I went and downloaded another copy of the driver from CNET (looks to be a Dell driver, based on some files contained within the driver package). This driver's installation utility failed with an error about an unsupported operating system, which I dealt with by right-clicking on it and going to the 'Compatibility' tab and choosing Windows Vista (no Service Packs) as the compatibility target. After that, the installer ran just fine. Now I have Aero and transparency and everything.

Out of the box, the system recognizes my stylus and allows for pen input and screen calibration. However, I wanted a few features that are only available from the official Wacom driver, so I downloaded it and tried to install it. The installation went fine, but upon reboot, the system no longer recognized my stylus at all. When I went to the control panels and clicked on the Wacom driver panel, it choked and failed with an error about how there were no compatible interfaces found on the system.... Luckily, after uninstalling the driver from my Programs list and uninstalling the drivers from the device manager, all is well again, though I'm stuck with the generic, MS driver.

Other than those hiccups, everything seems to be working well. The system is overtly similar to Windows 7, only with sharp corners and a little less transparency everywhere. Window borders are more opaque now, and they no longer have the Vista-style reflection/glare effects.

The 'ribbon' menu style has been adopted throughout the system and, while I don't really like it, I suspect it will grow on me, much like it did when introduced to Office 2007.

Before my video driver was installed, the Metro UI was horribly slow and took several seconds to transition to and from the traditional desktop view. However, with the driver installed, everything is snappy and attractive.

At this point, the Metro UI is sort of useless and is just a glorified launcher, but MS intends to have the launcher squares configurable and with live updates (i.e., your buddies list will update with who is online, the weather application will show live weather, etc.). However, applications will have to be written especially for the Metro UI using a new API, and MS intends to charge developers 30% of revenue for Metro apps, just like Apple does with their App Store.

If you have any questions about Windows 8 in general or its use on this computer, specifically, drop me a comment.

Tuesday, September 13, 2011

CCSM Locale Not Supported Error

My HTPC's compizconfig-settings-manager (ccsm) started failing to launch whenever I clicked on the link, so I tried to run it from the terminal to see what was up. When I did, I saw that it was coughing up this error:

(ccsm:8581): Gtk-WARNING **: Locale not supported by C library.
Using the fallback 'C' locale.
Info: No sexy-python package found, don't worry it's optional.
Traceback (most recent call last):
File "/usr/bin/ccsm", line 38, in
import ccm
File "/usr/lib/python2.5/site-packages/ccm/__init__.py", line 1, in
from ccm.Conflicts import *
File "/usr/lib/python2.5/site-packages/ccm/Conflicts.py", line 26, in
from ccm.Constants import *
File "/usr/lib/python2.5/site-packages/ccm/Constants.py", line 72, in
locale.setlocale(locale.LC_ALL, "")
File "/usr/lib/python2.5/locale.py", line 476, in setlocale
return _setlocale(category, locale)
locale.Error: unsupported locale setting
Turns out the fix is pretty simple. Just open up a terminal and type:

LC_All=en_US.utf8
Lang=en_US.utf8
ccsm

one after another.

Unfortunately, this fix doesn't seem to stick, so you have to do it every time you want to launch.

Thursday, August 25, 2011

Intermediate Guide to SF4 EMG (Model) Swapping

Sloth86 has cracked model manipulation in SF4 wide open. It's now possible to swap models from character to character and costume to costume in a fairly consistent manner, thanks to sloth86's research. Additionally, he was nice enough to write simple, straightforward graphical tools that extend this ability to almost anyone. Just to be clear, though: this procedure often produces strange results, especially with respect to animations. Sometimes these results can be fixed through model editing, sometimes not.

In this tutorial, we're going to use sloth86's methods to take an EMG model from one character and replace it with an EMG model from another character.

First things first, lets get all of the tools we'll need. This is a pretty advanced procedure, so we're going to need piecemontee's SF4Viewer (aka, Asset Explorer), Kensou's Tool(s) and Sloth's tools, specifically, EMGSwap and DDSREFEDIT. Once you have those tools downloaded and organized, we're ready to get started.

First, identify which model you want to move and where you want to put it. I'm planning to take Guy's head (donor model) and place it on Ryu's body (recipient model).

Once you've got it all planned out, open both models (for me, GUY_01.obj.emo and RYU_01.obj.emo) in the Asset Explorer and find the desired objects--in my case Guy's 8th EMG (counting each model, starting from the top in the Asset Explorer's display)--and I'm going to replace Ryu's 12th EMG. The recipient's numbers are important, so write it/them down.
Now, select the donor object, right-click and choose 'Raw dump,' name it something informative (I chose face.emg) and click 'save.'
Next, armed with our model files and numbers, place both the donor *.emg file and recipient *.obj.emo file into the same directory as EMGSwap and double-click on EMGSwap to run it.

This window should pop up:
In the field labeled "Input EMO file," type the name of the recipient model, in my case RYU_01.obj.emo. Then, in the field labeled "EMG # to swap out," type the number of the recipient model you wish to replace, in my case 12 (for Ryu's 12th EMG model, the face). Next, in the field labeled "EMG file to swap in," type in the name of our raw-dumped donor model, in my case face.emg. Finally, in the field labeled "Output EMO file," we'll just leave the default 'new.emo' for now (we'll rename it to replace the old model later, but in the meantime, we don't want to mess anything up before we're sure it's cool).
Click 'Go' and cross your fingers. If all goes well, you should see a window like this pop up:
Looks good so far.

Now, lets check out our Frankenstein's monster by opening the 'new.emo' file in the Asset Explorer:
Yeesh, looks pretty freaky. Since Guy's head was sized and positioned significantly differently from Ryu's, we're going to have to change some things up to make it look normal again.

So, still in the Asset Explorer, lets select our newly imported model, right-click and choose 'Extract...' from the menu. Name it something informative--like face.obj--and click 'save.'
At this point, you might be asking yourself, "if I'm extracting and converting into an obj anyway, why didn't I just export from Guy's model and import straight into Ryu's model in the Asset Explorer, skipping all this EMGSwap bullshit?" Well, smarty-pants, most files in AE (including the *.obj.emo files we're messing with right now) include an index that includes the location and size of each and every file contained within. The Asset Explorer uses this index to determine what can and can't be extracted/injected safely.

However, sloth86's EMGSwap tool rewrites this index for us, so the Asset Explorer can safely extract/inject our borrowed models once EMGSwap has done its thing. Perhaps someday that same functionality will be integrated directly into the Asset Explorer (it's open source, after all), but that day is not today.

Anyway, so we've gotten our model swapped in, but it looks like crap and we'll need to use model editing to fix it. I'm not going to spend a lot of time on this part, since you should already know about model editing enough to fix things yourself. For me, Guy's head was the wrong size, so I needed to enlarge it and move it around a bit. I really should edit Ryu's neck to meet the head, too, but you get the idea...
Alright, with my edits in place, the model looks okay, but you'll notice that the skin looks all white and pasty. That's because it's looking to Ryu's first DDS texture, which corresponds to--you guessed it--his duffel bag. This is actually convenient for my purposes, since I can just replace the duffel texture with my donor texture. Thus, I won't need to edit a bunch of DDS references using sloth86's DDSREFEDIT tool, but you probably will (hence, why I included it in the tools you'd need to download).

I'm only going to use it a little, but I'll try to tell you more about it when the time comes.

In the meantime, we need to create some new texture and normal map containers to go with our new model. To do it, we'll use Kensou's sf4tool, just like in this earlier tutorial I made.

Open your donor's *.col.emb and *.nml.emb files in the Asset Explorer, find the textures that correspond to your donated model, right-click and choose to 'Extract...' them. Name them something informative (I used 'Guy.dds' and 'Guynmap.dds') and click 'save.'

Next, open your recipient's *.col.emb and *.nml.emb files in the Asset Explorer an extract *ALL* of his or her DDS textures. Be sure to name them something informative so you can remember which order they're stored (1.dds, 2.dds, etc. and 1nmap.dds, 2nmap.dds, etc. work well).

Now, as per the aforementioned tutorial, create new *.col.emb and *.nml.emb files with your donated textures in the first position. (I actually replaced my recipient's first textures, so the order for mine was Guy.dds, 2.dds, etc. and Guynmap.dds, 2nmap.dds, etc.) EDIT: I used the first position, but apparently the *last* position is more likely to work...?
At this point, you would run the DDSREFEDIT tool and input the number '0' into the 'new texture map' field and '1' into the 'new normal map' fields (assuming your recipient only had a single texture to begin with; this isn't the case with shoto original costumes, though, so count the textures if you need to, according to the instructions in the program; I had to use '5' for the normal map number), your modified *.obj.emo file in the 'Input EMO file' field, and the number of your recipient's replaced model in the EMG # field (in my case, it was '12'). You would then check the box for '+1 to every other normal map references' (this last bit was unnecessary for me because I replaced the duffel bag normal map with the donated normal map).

This was my result:
Anyway, if this last part seems confusing, don't worry about it. I'll be making another tutorial that goes over the texture reassignment tool using a more typical example in the future. In the meantime, try your best, share your work and ALWAYS MAKE BACKUPS.

Wednesday, August 17, 2011

MUTV Live Streaming

[Description]

Watch MUTV Live Streaming

Chelsea TV Live Streaming

[Description]
Watch Chelsea TV Live Streaming

Cari Farmasi

Farmasi Di Kuala Lumpur dan Selangor Selangor / KL Area NO SHOPS NAMES ...