Friday, August 12, 2011

Test Driving Oneiric Ocelot on ThinkPad X120e

It's that time again. With another Ubuntu release looming on the horizon, I decided to upgrade my netbook to the latest daily build (8/12/11) of Ubuntu 11.10 Oneiric Ocelot, which is still in alpha stage.


Installation


Installation was unchanged from 11.04, so much so, in fact, that it even says "Welcome to Natty Narwhal" :P


As with Natty, installation was quick and easy, with the option to download updates in the background as you go. As before, personalization questions were presented *after* installation had already begun, which saves even more time.


First Impressions


The login screen has changed a bit, and now looks really snazzy, with a stylish dot motif in the background. There's an option to select a Guest Account, along with the option to use the new 2D/non-accelerated Unity desktop, which I believe is powered by the Enlightenment libraries. This 2D desktop supports true transparency, which is nice.


Drivers


The jockey-powered "Additional Drivers" utility automatically found the binary driver for my wireless, which is the nonstandard Broadcom chipset option, so all I had to do is tell it to activate it. CORRECTION: My wireless driver was enabled, but not working. On returning to jockey, the driver was listed as not installed and if I tried to enable it, it would give me the error:
SystemError: E:Unable to correct problems, you have held broken packages.
This suggests that my packages were installed, but somehow got messed up. To fix it, I had to find out which packages for my chipset were installed, by typing:
dpkg -l | grep roadcom
(notice, I searched for 'roadcom,' which will catch packages with both 'broadcom' and 'Broadcom' in the title and/or description. This is important, as the bcmwl-kernel-source package will not show up if you search for 'broadcom' alone.) Then remove them entirely by typing
sudo apt-get purge [package names from the previous command]
Reboot, then try the 'Additional Drivers' utility again. It should successfully enable the driver, then you can reboot again and everything should be working properly.


If you got the standard chipset, it should use the open source driver by default. The default video driver is the Gallium-3D-driven open source driver, but I chose to install the proprietary fglrx driver from AMD via the driver utility.


Audio seems fine and my HDMI audio hardware and output were both recognized from the start. The headphone jack also properly mutes the internal speakers when headphones are plugged in, which is an improvement over my experience with Natty.


Waking from suspend seems fine, too, though hibernation still seems to be a no-go. :(


Applications


The default email client is now Thunderbird, which works well with Firefox, the default browser, and the default music client is now banshee (this may not have been a new change; I can't really remember...).


The built-in search tool for Unity is much improved, with little icons down at the bottom of the window for choosing whether to search everything, just files and folders, just applications, or just search your music collection.


Everything seems to be fine so far, a solid improvement over Natty on these machines. I'll post back if I run into any problems. If you have any questions or experience any problems, post a comment!

Sunday, July 31, 2011

My DIY Backloaded Horn

Over the past 6 months or so, I've been researching and ultimately building a pair of backloaded horns. At the time of this writing, I've only actually finished one of them, but I decided to go ahead and make a post about it.


My Phase Technology Teatro 7.5s sound great, but they're pretty weak on the low-end. I've been supplementing with a shitty powered subwoofer scavenged from a boxed 5.1 surround system, but it just doesn't cut it, unfortunately, so I decided to build some speakers that would cover it a little better.


Since getting my upper-mid horns and hearing their clarity and definition, I wanted to go with another horn for the bass, if possible. I've seen a lot of really crazy, gigantic basshorns on the internet and wanted to avoid the size that would be required to reach below 100 Hz with a compression driver--not to mention the batshit crazy prices that large-scale compression drivers go for on eBay and Audiogon--so I decided to look into backloaded horns.


Ideally, a horn should be as long as the wavelength of the lowest frequency you wish to reproduce, with a mouth of approximately that same diameter, thus bass horns have to be gigantic to reach low frequencies. You can cheat a little, though, by placing the horn against the floor and/or wall of your room, which lets you cut the wavelength requirement by half for each surface, as it uses the walls/floor as if they were a part of the horn. Furthermore, backloaded horns are typically folded horns, which lets them squeeze a lot of length into a relatively small package. Finally, by starting with a large cone driver, your required horn length is reduced further still.


I used this 8" driver for the horns, based on their high sensitivity, though these would also be an excellent alternative. If you don't plan to supplement the horns with a tweeter like I intend to do, you might also consider using a full-range driver, like this one, though it is obviously more expensive. This driver is another good option if you want to play at high volumes, due to its high power handling and *huge* cone excursion.


I came up with my own design for the horn itself, based loosely on some designs I found around online. However, most of the designs I found have the mouth of the horn opening into the wall, which I was afraid would deaden the sound, based on how directive my upper mid horns are. So, I tweaked those designs a bit and ended up with something I could construct out of a single sheet of 4'x8' of wood (MDF [medium-density fiberboard] is the best for speakers, but it's heavy, expensive and rough on your tools; particleboard is a good compromise, IMO, insofar as it is very cheap, but with many of the same characteristics as the more expensive MDF; plywood works, too, but it's ugly).


I used 1/2" particleboard, though TBH, 3/4" would probably have been a better choice, both for rigidity and sound isolation. The sides are 2'x4', the back is 1'x4' and everything else is 1'x2' (i.e., the front, the top/bottom and the interior partitions; the last piece is cut in half and glued together at a right angle). I'm not going to go into much detail about the actual construction, since I'm a shitty carpenter and I'm sure you can find better instructions on box-making online than I could ever provide. Anyway...
Glue the pieces together using wood glue, and don't be afraid to really gob it on. You want it to seep into all of those little nooks and crannies in the wood and form a good seal. You can see the excess squeezing out from under the board in this pic:
To be sure that the junctions are all airtight and won't be leaking air into each adjacent chambers, you can follow behind with silicone caulk or "liquid nails" formulated for wood, which is what I used:
If you look closely, you can also see the right-angle brackets I used to reinforce the box structure.
After all of the interior structure is glued solidly into place, you can glue the other side panel to seal the cabinet shut. I used the liquid nails instead of wood glue to seal it, with a bunch of cinder blocks, books, records, etc. piled on top to get a good connection while the goo dries:
One thing to remember before sealing the cabinet: go ahead and thread some speaker wire through because it'll be much easier now than if you wait. If you do forget (like I did, actually), you can tie the wire around something (I used my dog's Kong toy), drop it into the speaker hole and then flip the whole thing around until it pops out the mouth of the horn. This is harder than it sounds, though, because these horns are gigantic and heavy as shit.


Another bit of advice, do your painting *after* your gluing (unlike me), so you don't have to worry about excess glue spilling over onto your fancy paint job.


Most of the projects I've seen online make a big deal about filling any cavities with sand or kitty litter so they don't turn into resonance chambers, but I don't really notice any problems and I did not do it. Of course, YMMV.


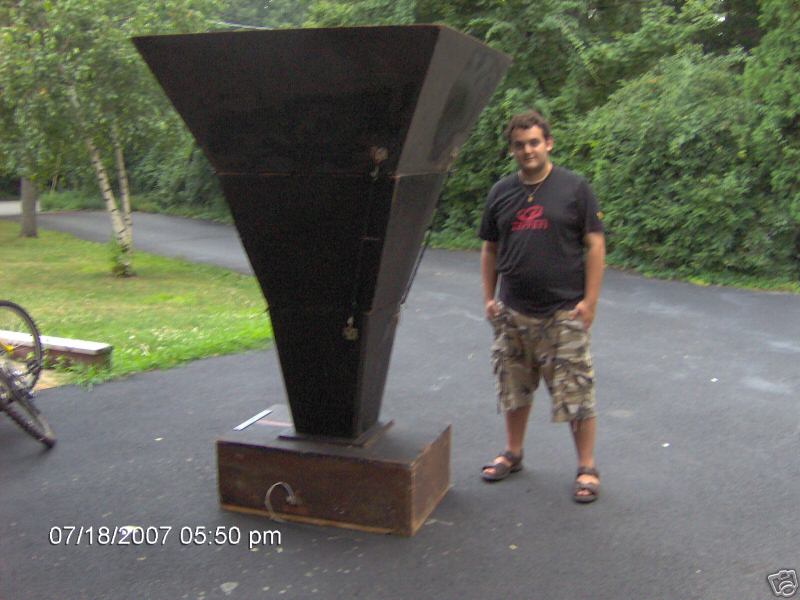
Anyway, here's the finished product:
You can see my small upper mid horn perched on top. You can also see the speaker wire dangling out of the mouth of the horn, since I haven't purchased proper binding posts yet (maybe never...).


As far as the sound, the bass response is considerably more potent than I expected. The driver works as a direct radiator (so better quality drivers will make a noticeable difference in sound quality), while the low frequencies bounce around inside and bellow out of the horn's mouth. The horn produces some of the clearest, most defined bass I've ever encountered, though it is definitely lacking above 1 kHz. That in mind, I intend to pair it with either this tweeter or this one.


One last picture of the finished horn, this time from the side:
The depth is really what makes these guys huge. Special thanks to my wife, who is gracious and long-suffering :-P

Libyan Couscous with Onion & Vegetables الكسكسي الليبي بالبصلة والخضرة

Libyan Couscous with Onion & Vegetables كسكسي ليبي بالبصلة والخضرة

Scroll down for English post
الكـسكـسي هو طبق تقليدي في شمال أفريقيا وصقلية عادة يتم تقديمه مع يخنة اللحم والخضروات فوقه، وهو يعتبر طبق رئيسي في شمال غرب أفريقيا عموما (المغرب، الجزائر، تونس، ليبيا)، اليوم سنعرف أكثر عن طبق الكـسكـسي الليبي، وهو طبق حار له أكثر من شكل ونوع، أحد هذه الأنواع يسمى الكسكسي بالبُصلة أي البصل ويتم تقديمه مع يخنة البصل والحمص فوقه مع اللحم، والنوع الآخر يطلق عليه الكسكـسي بالخُضرة أي الخضروات، والذي يقدم وفوقه يخنة الخضروات مع اللحم، اليوم سوف أمزج بين الاثنين فهو حقاً طبق لذيذ يجب أن تجربونه. عادة في ليبيا يتم تقديم هذا الطبق في طبق كبير عميق للتقديم للعائلة كلها (5 أشخاص) أو تقديم أكثر من طبق تقديم لكل مجموعة إذا كانت العائلة أكبر، يتم تقديم هذا الطبق خاصة في العزائم وولائم الأعراس أو الاحتفال بمولود جديد، وبالطبع هو طبق رئيسي على مائدة الإفطار في رمضان. الكسكسي يتم طهيه في إناء البخار أو ما يطلق عليه الكِسكاس في ليبيا.

يتم طهي الكـسكـسي بالجزء العلوي من إناء البخار أو بالكسكاس على البخار ويخنة اللحم تنضج في الجزء السفلي من الإناء، ومن ثم يتم تقديمهم معاً، إذا لم يكن لديكم إناء بخار يمكنكم طهي الكسكسي بالطريقة المفضلة لكم ولكن يجب التأكد من أنه لن يلتصق ببعضه وسيكون هش ومتناثر.

نصيحة الوصفة:

1- يجب التأكد من اتباع الخطوات بدقة وعدم طهي الكـسكـسي أكثر من اللازم ويتم فركه ليصبح هش كما سيتم ذكره.
2- هناك خلطة توابل ليبية تسمى بزار الكسكسي أو بهاراته إذا لم تتوفر لديكم يمكنكم خلط (كركم مع خولنجان مطحون أو "عود اللحم") إذا لم يتوافر الخولنجان يمكن استخدام التوابل التالية: ملعقة شاي أو مقدار من كل من (كمون - كزبرة جافة - كركم - زنجبيل بودرة - قرفة - كاري) مع نصف ملعقة شاي أو نصف مقدار من الحبهان المطحون.
3- عند الحاجة لإضافة ماء إلى اللحم يجب أن يكون الماء ساخن حتى يبقى اللحم طري ولا يأخذ وقت طويل في الطهي.
4- قوموا باتباع الخطوة رقم 4 بدقة وحذر كالشرح تماماً.
5- أنصح بأكل هذا الطبق مع مخلل الزيتون الأخضر فهو حقاً لذيذ معه :)

الوصفة تكفـي: 3 إلى 4 أشخاص
وقت التحضير: 15 دقيقة
وقت الطهــــي: من 90 إلى 120 دقيقة 
Couscous is a North African and Sicilian dish of semolina traditionally served with a meat or vegetable stew spooned over it. Couscous is a staple food throughout northwest Africa (Morocco, Algeria, Tunisia, and Libya), today we are going to know more about Libyan couscous, which is really spicy and has many types, one of them is called (Couscousy Bel Bouslah) with means "couscous with onions" and it's served with onion & chickpeas stew on top of it with meat, also there's another one called (Couscousy Bel Khodrah) which means Couscous with vegetables, and it's served with vegetable stew and meat on top of it, today I'm mixing between both dishes and it's a real great yummy dish that you really need to try. This dish in Libya is usually served in one big deep serving dish to the whole family (5 people) or one serving to each group if the family is bigger, it's served specially when having friends and family home for lunch, or in wedding celebrations, or new born baby celebration, and of course it's a main dish on Iftar in Ramadan. Couscous is being cooked in steam pot which is called in Libya "KisKaas".
So the couscous is cooked on the top by steaming and the stew on the bottom part of the pot, and then served together, if you don't have a steaming pot and want to try it it's OK just cook the couscous your way and make sure to keep it fluffy.

Recipe tips:
1- Make sure to follow the steps and not over cook the couscous and rub it till it's fluffy as followed.
2- There is a Libyan mix of spice used in this dish called "Bezaar Liby", if you don't have it mix (turmeric & galangal) or this spice mix (1 tsp each cumin- coriander- turmeric- ginger powder - cinnamon - curry) with 1/2 tsp cardamom powder.
3- When you need to add water to the meat you should add hot water so the meat still juicy and doesn't take much time cooking.
4- Follow step 4 carefully just as I said.
5- I recommend serving this dish with green olives pickled (really yummy).

Serves: 3 to 4 people
Prep time: 15 minutes
Cooking time: 90 to 120 minutes
Click here for the recipe اضغط هنا للوصفة »

Thursday, July 28, 2011

How to Create High-Resolution Textures in SSF4AE - PC

This tutorial covers how to create *.col.emb files from scratch using Kensou's Tools. These files can contain any number or variety of DDS textures of any size/resolution or compression type (DXT*). The most common usage for this is to create textures that are higher resolution than the default textures, but it can be used for other purposes, as well.

Sensibeat's tutorial for making high-resolution textures is much more informative, but requires a level of comfort working with hexadecimal code and calculations. This method is considerably easier but you should still try to understand sensibeat's instructions since the same techniques are helpful in other aspects of modding.

Anyway, lets get started. All you need are piecemontee's Asset Explorer and Kensou's sf4tool.

Step 1. Open a *.col.emb file in the Asset Explorer and extract the DDS textures. Name them something simple that reflects the order they're supposed to come in (I like to use 1.dds, 2.dds, etc.).
Step 2. Open the DDS textures in a paint/editing program, such as Photoshop or GIMP, and scale them to the desired resolution. In this case, I'm scaling a bunch of 512x512 textures up to 1024x1024.
Step 3. Save the textures as new DDS files with any compression you like. This is your opportunity to change, for example, DXT1 textures into DXT5 to allow for semi-tranparency.
Step 4. Now, open the directory for Kensou's sf4tool.exe (NOT sf4toolnew.exe). If you don't have a directory named 'emb' in there, create it now, and then put your enlarged DDS textures into it. Next, run sf4tool.exe by double-clicking it.
Step 5. In the big file-directory pane on the upper-right of the window, double-click on your emb directory and click on the left-hand button underneath the big pane. The smaller pane to the left should populate with your files. Put them in the proper order by changing the filenames in the smaller pane (you can just click in there and type) and then click on the right-hand button to bundle them all together.

Step 6. Back in your 'emb' directory, you should have a new file called 'newpack.emz.' Rename it to match the col file you're trying to create, in my case GKI_01_01.col.emb.

All set! The *.col.emb file you're left with is formatted a little strangely and contains some garbage hex in the index and at the end of the file, but AE doesn't seem to care, so neither do I. :P

You can now use the Asset Explorer to extract/inject textures from your new file using the new textures as a base for mods.

Tuesday, July 19, 2011

Ho-Hos Strawberry Jelly Trifle ترايفل جيلي الفراولة وهوهوز


Scroll down for English post
رمضان هذه السنة في عز الصيف والحر الشديد، لذا يلزمنا وصفات منعشة ومرطبة في هذا الجو كحلوى بعد الإفطار، لذلك اخترت اليوم وصفة ترايفل الجيلي والهوهوز، وهي حلوى خفيفة صيفية رائعة، تتكون من الجيلي والكاسترد وكيك هوهوز والفواكه الصيفية، أتمنى أن تعجبكم.

نصيحة الوصفة:
1- قمت بعمل الجيلي والكسترد حسب الوصفة المكتوبة على العبوات، ويمكن أن تختلف عن ما تشترونه فيجب اتباع الخطوات من العبوة نفسها.
2- يجب وضع بلاستيك (كلينج فيلم) على وجه الكسترد بعد طهيه بحيث يلامس سطحه حتى لا تتكون قشرة سميكة أعلاه وينزع عند الاستخدام.
3- لابد من تذوق الجيلي والكسترد وتحليته بالقدر المطلوب قبل وضعه في الأكواب.
4- إذا كان لديكم الوقت يمكنكم تأجيل عمل الكاسترد وتبريد الجيلي قبل الخطوة رقم 5 والبدء في عمل الكاسترد بعد أن يبرد الجيلي تماماً ومن ثم البدء في الخطوة رقم 5.

الوصفة تكفــي: 6 أكواب
وقت التحضير: 15 دقائق
وقت التبــــريد: 4 إلى 5 ساعات
Ramadan this year meets the middle of the hot summer, so we need some refreshing cold recipes as desserts after Iftar, so I chose jelly trifle for today, it's a refreshing dessert that contains strawberry jelly, custard, HoHos cakes, and summer fruit, I hope you like it :)

Recipe Tips:
1- I made the jelly and the custard according to the recipe on the packages, it could be different from one product to another so be careful, and you can use your own recipe.
2- After cooking the custard you have to cover it with cling film and let the plastic touch it from the top so it won't have a crust on top, and remove the plastic once you use the custard.
3- Taste the jelly and the custard before adding to the cups, they may need some sugar.
4- You can make the custard later and chill the jelly first before step No. 5 and start making the custard after the jelly is chilled.

Serves: 6 cups
Prep. Time: 15 minutes
Chill Time: 4 to 5 hours
Click here for the recipe اضغط هنا للوصفة »

Tuesday, July 12, 2011

Egyptian "Keshk Almaz" & Broiled Chicken كشك ألمظ مع دجاج محمر

Egyptian "Keshk Almaz" & Broiled Chicken كشك ألمظ مع دجاج محمر

Scroll down for English post
شهر رمضان على الأبواب كل عام وأنتم بخير، وعندما يذكر شهر رمضان تذكر العزائم العائلية والتجمعات على الإفطار وكثرة الزيارات، كما نذكر أيضاً أشهى الأكلات التي تتميز بطابع خاص في رمضان وعند البعض لا تؤكل هذه الأكلات إلا كل سنة في شهر رمضان فقط. قمت بوضع قائمة بأشهى الوصفات لرمضان على يمين الصفحة وسوف أضيف الوصفات الرمضانية من مختلف البلاد بالخطوات المصورة إلى أن ينتهي الشهر الكريم إن شاء الله. وصفة اليوم ربما تكون جديدة على البعض وغريبة على البعض الآخر ولكنها تعتبر من الوجبات الرائعة لمن تربوا عليها خصوصاً في شهر رمضان، وصفة اليوم هي وصفة مصرية عبارة عن مزيج من الأرز والحليب ومرقة الدجاج والبصل المحمر يتم طهيهم ليكوِّنوا طبق كريمي القوام يشبه حلوى الأرز باللبن ولكنه طبق مالح ويسمى الكشك المصري وليس الصعيدي فهناك طبق آخر بنفس الاسم مشهور بصعيد مصر وهو مختلف تماماً، وصفة اليوم للكشك البعض يطلق عليه كشك ألمظ والبعض الآخر يطلق عليه كشك ألماظية، وهناك من يقوم باستخدام لبن الزبادي بدلاً من الحليب في هذه الوصفة. دائماً ما أحب هذا الطبق مع الدجاج المسلوق والمحمر بمعجون الطماطم فهو حقاً رائع معها، يمكن أكله كطبق رئيسي والبعض يأكله بالأرز والبعض الآخر يأكله بالخبز. هيا بنا نتابع معاً الكشك المصري طبق اليوم لرمضان.

نصيحة الوصفة:
1- لسلق الدجاجة، تنظف جيداً وتوضع في إناء مغطاه بالماء على نار عالية ويوضع معها بصلة متوسطة و2 ورقة غار أو لورى و2 حبة حبهان أو هيل وملعقة كبيرة من الملح وفلفل وزنجبيل حسب الرغبة وتزال أي رغوة تظهر على وجه المرقة، عند الغليان نهدئ النار إلى متوسط لهادئ ونتركها لتنضج ساعة تقريباً حسب حجمها.
2- لن يكون الأرز مشابه لما نقوم بطهيه مع الأكلات العادية وإنما سيكون أكثر نضجاً وسيكون المرق كثير ولن يجف المرق بعد أن ينضج الأرز.
3- إذا جف الكشك على النار أثناء طهيه يمكن إضافة بعض الحليب إليه وتقليبه حتى يغلي.

الوصفة تكفــي: 2 إلى 3 أشخاص
وقت التحضير: 5 دقائق
وقت الطهــــي: 30 إلى 60 دقيقة تقريباً
Ramadan is coming in a few days, and when we mention Ramadan we remember the family and friends gathering for Iftar and the visits around the month, we also remember the most delicious dishes that are special in this month and some people only eat it once a year only in Ramadhan. I added "Ramadan Menu" here on the right and I will add Ramadan recipes from different countries supported with photos till the end of Ramadan. Today's recipe may be new for some people and strange for some others but it's considered as one of the delicious dishes for people who used to eat it especially in Ramadhan, today's recipe is an Egyptian recipe which consists of rice, milk, chicken broth and caramelized fried onions cooked together to end up with creamy texture that looks like the rice pudding but a salty dish which is Egyptian "Keshk" and I don't mean the upper Egypt "Keshk" because it's another different dish. Some people call it "Keshk Almaz" some others call it "Keshk Almazeya", some people use yogurt instead of milk. I always love to eat this dish with boiled chicken and then broil it in the oven after rubbing it with tomato paste and sprinkle some salt mmm yummy, you can eat this dish as it is some people eat it with rice some others eat it with bread, it's up to you. Let's  see our Ramadhan dish for today >> Egyptian "Kishk".

Recipe tips:
1- To boil a chicken, after cleaning properly cover it with water on high heat and add to the water a whole medium onion, 2 bay leaf, 2 cardamoms, 1 tbsp salt, pepper, and ginger, and remove any foam that appears on top of it, and when it's boiled low the heat to medium low, and let it cook for about an hour depending on its weight.
2- The rice here won't look like the normal cooked rice, the broth will be much more than rice and it will be more cooked and the broth won't dry when it's cooked.
3- If the Keshk dried from milk or broth add some more milk and mix well till boiled.

Serves: 2 to 3 people
Prep. time: 5 minutes
Cooking time: 30 to 60 minutes
Click here for the recipe اضغط هنا للوصفة »

Thursday, July 7, 2011

Sensibeat's cmn File Size Editing Tutorial (Also Applicable to Other emz Bundles)

cmn.emz file size editing tutorial

So now we want to copy some file in our cmn.emz.

We need the Length of the file.
Calculate it or easier, just open the file in the hexadecimal editor, the last offset number is our Length.

I want to "inject" an edited HWK.fce.ema


Last offset is 7BA97 so our Length will be 97 BA 07 00

Note that it's smaller than ZGF.fce.ema but it works the same with bigger files.

Now let's find the ZGF.fce.ema location (search works well too but let's use our new knowledge)
TB = 9C5C28+38 = 9C5C60
The true beginning of the #EMA is at offset 9C5C60
[IMG]

I select the full file


I overwrite it with the HWK.fce.ema file


I insert blanks (00) to make the next #EMA begin at the start of a line (like it was)
[IMG]

Now I know there are 3 files after the one I inserted (Thx to piecemontee's AE) that were moved by my changes.
I need to check the TBs of the #EMA #BAC #BCM + the TBs of the files at the end:

#EMA TB: A41700
A41700 - 40 (CL) = A416C0 (RL)


#BAC TB: A5B6A0
A5B6A0 - 48 (CL) = A5B658 (RL)


#BCM TB: A826B0
A826B0 - 50 (CL) = A82660 (RL)


ZGF.skl.emo TB: A843E0
ZGF.skl.emm TB: A843EC
ZGF.obj.ema TB: A843F8
ZGF.fce.ema TB: A84404
ZGF.cam.ema TB: A84410
ZGF.bac TB: A8441C
ZGF.bcm TB: A84424

We need to enter the Length of the new fce.ema (other lengths didn't change), and new RLs and TBs backwards:


Et voilà.

Cari Farmasi

Farmasi Di Kuala Lumpur dan Selangor Selangor / KL Area NO SHOPS NAMES ...